Create/Export calendar
Step 1/4: Create calendar
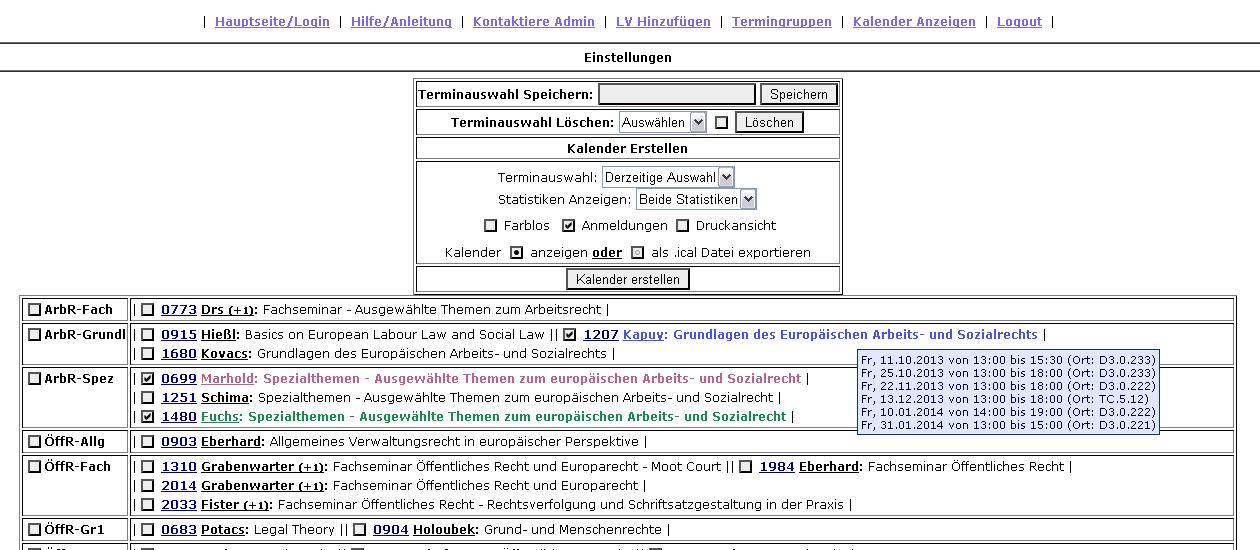
Basically you select your saved courses and create the calendar.
By scrolling over a certain course with your mouse, a blue box will show up with the particular course dates (see picture below).
- The combination of selected courses can be saved/deleted and allows for easy switching and comparing of alternative combinations of courses.
- If you choose "Current Selection" among the option "Course date selection", the calendar will appear with all the checked courses. Otherwise select the saved course selection in this drop-down menu.
- The option "show statistics" allows you the display certain statistics about the selected courses (see statistics below).
- Every selected course will appear in a different color in your calendar.
- Through the option "colorless" you can display all selected courses in black.
- The option "Registration" determines whether registration/ de-registration dates should be shown in the calendar.
- The option "Print view" determines whether only the calender (possibly including statistics) should be shown (course selection, calender settings and menu will be hidden).
Basically there are two options of the calendar: Show/print the calendar normally in your browser or export it as .ical file for your organizer (outlook, google calendar, smartphone apps, etc.)
 Step 2/4 : Statistics
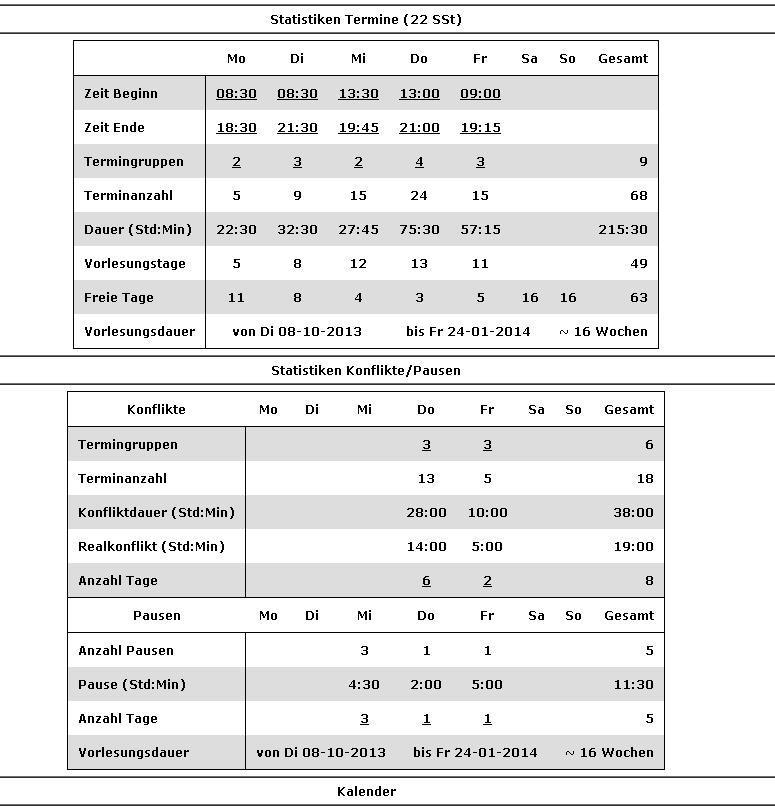
Statistics are dividied into two parts: one about the courses in general and one about clashes and breaks.
The information is divided between specific weekdays.
If there is an underlined text, you can hover over it with your mouse and extra information will show up.
Statistics dates
- "Start time!" is the start of the first course of the day (extra info: specific division of the start times of the semester).
- "End time" is the end time of the last course of the day (extra info: specific division of the end times of the semester).
- "Course groups" is the number of courses that will take place on a day (extra info: list of courses with course names).
- "Number of courses" is the number of course dates that will take place on a day.
- "Duration" is the overall duration of classes on a day.
- "Lecture days" ist he number of days with at least one class.
- "Free days" is the number of days with no class
Statistics clashes/breaks
- "Course groups" is the number of courses that will take place on a day (extra info: list of courses with course names).
- "Number of courses" is the number of course dates that will take place on a day.
- "Clash duration" is the duration of all class clashes in total.
- "Real clash " is the duration of clash in real time.
- "Number of days" is the amount of days with course clashes.
- "Number of breaks" is the amount of breaks.
- "Duration of breaks" is the duration of breaks.
- "Number of days" is the number of days with breaks.
- "Duration of lectures" is the duration from the first day until the last day of lectures
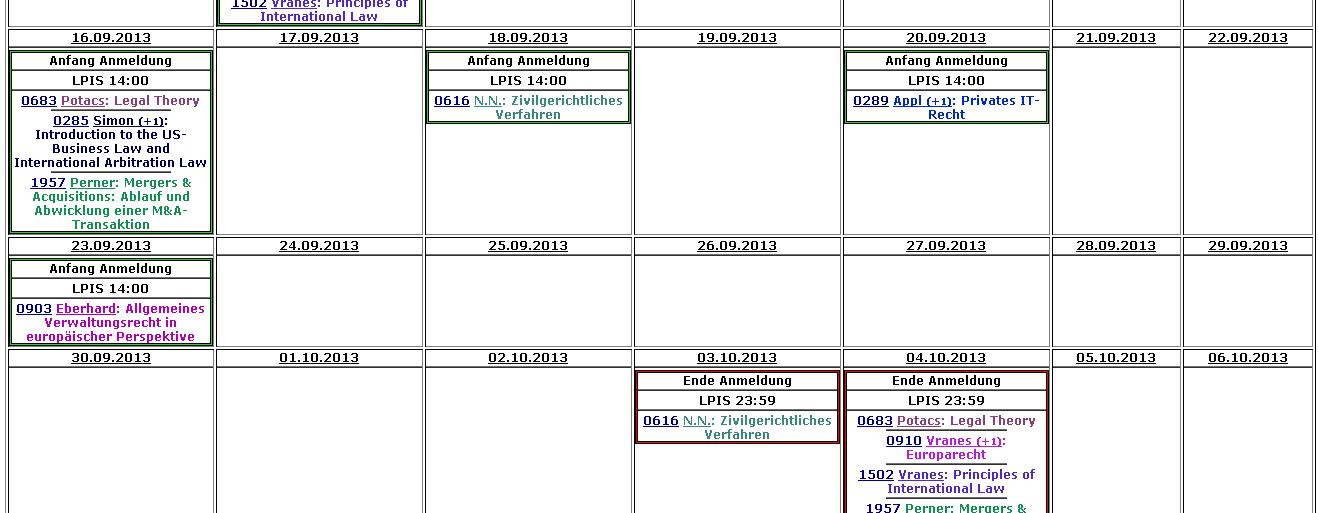
Step 3/4: Show registrations
If the option of showing Registrations/De-registrations has been selected, it will be shown in the calender
- Green frame means Registration.
- Red frame means De-registration.
Bear in mind that there are also other options for course registration than LPIS.
Those options will be mentioned in the information to the particular course (but only if there is a date scheduled for this).
In case there is no date scheduled (e.g. registration after an entry exam), no information will appear; the WU electronic course directory (eVVZ) must be checked separately.
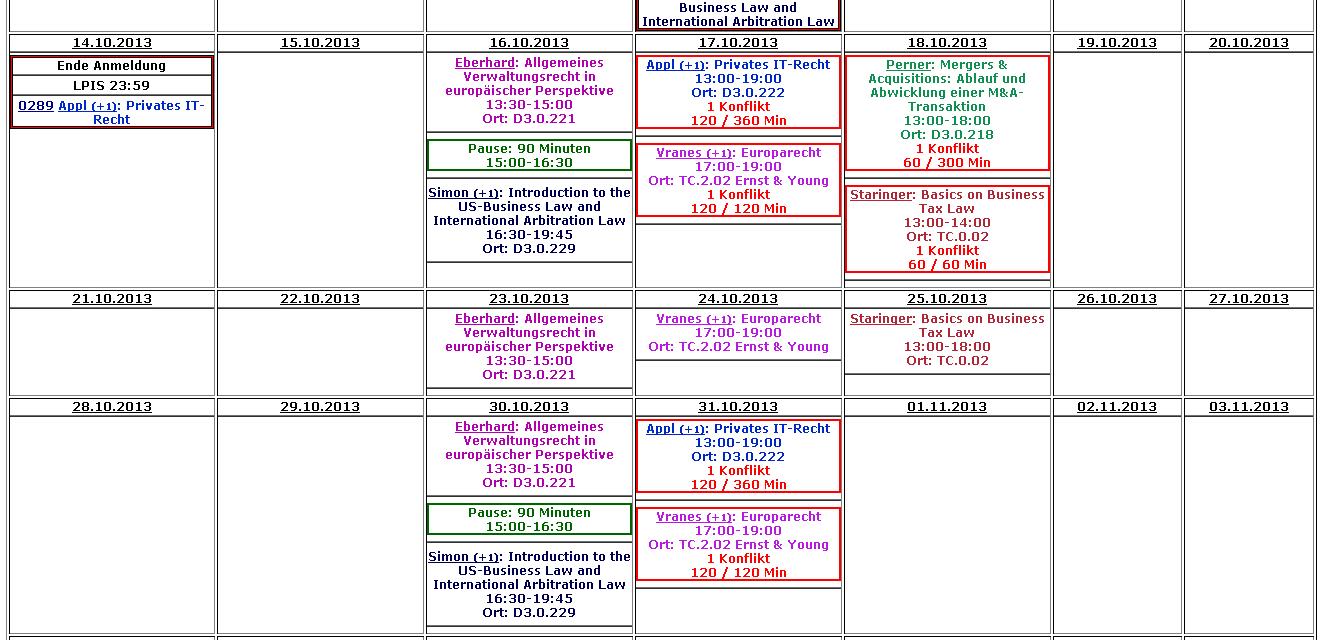
Step 4/4: Show calendar
- A red frame represents a clash with other courses.
- A green frame represents a break.
- A Yellow frame displays the last class of a course (often also the final exam).

Es ist im Moment nicht moglich das Passwort zu andern oder sich ein neues zu erstellen wenn man es vergisst.
Auf der Seite Neue LV dazugeben kann man sich neue LV's ins System speichern damit man sich diese spater auf der aufrufen aufrufen kann.
Zum speichern einer LV muss man 4 Daten eingeben.
LV nummer: Das ist die LV nummer die im VVZ steht (max 4 Zeichen)
Name: Ist der name der vorlesung so wie er spater auf deiner Liste und im Kalender angezeigt wird (max 200 Zeichen)
LPIS Anmeldungsdatum: Das ist das Datum welches im VVZ steht, wann die Anmeldung anfangt zu laufen.
Man kann eine LV ins system speichern OHNE einen Anmeldungsdatum dazuzugeben.
Allerdings wenn man einen dazu gibt wird dieser Termin auch im Kalender Angezeigt, somit kann man gegebenenfalls sehen ob mehrere Anmeldungen am selben Tag laufen.
Uhrzeit fur Anmeldungen ist grundsatzlich 14:00
LV termine: Hier werden die LV termine hinenkopiert genau so wie sie im VVZ stehen, mit Zeilenumbruchen.
Beispiel:
Do, 07.10.2010 15:30-17:00 Uhr Extern
Do, 14.10.2010 15:30-17:00 Uhr Extern
Do, 21.10.2010 15:30-17:00 Uhr Extern
Do, 28.10.2010 15:30-17:00 Uhr Extern
Zum anzeigen der abgespeicherten LV's
Auf der seite zum anzeigen der LV's wird man, nachdem man sich mindestens eine LV abgespeichert hat, auf der linken seite eine Liste sehen
Um den Kalender zu erstellen muss man bei den gewunschten LV's, die angezeigt werden sollen, ein Kreuz setzen und auf "Kalender Neu Erstellen" kliken.
Mit dem darunterliegenden Knopf mit der beschriftung "Ausgewaehlte Loeschen" kann man die LV's die angekreutzt sind (bei denen zB. die LV Termine falsch eingegeben wurden) LOSCHEN.
Als Sicherheitsmassnahme muss man auch das Kastchen neben dem Knopf auch ankreuzen.
*/?>


 |
|
|
|
|
|
|
|
|
|